


We will show you how to set up Search Console in 5 minutes.
Setting a Google Search Console is very easy. There are many ways to set up a search console.
Google has already given steps to set up the Google Search Console. But we are giving a user-friendly guide to set up a search console.
Why use Search Console?
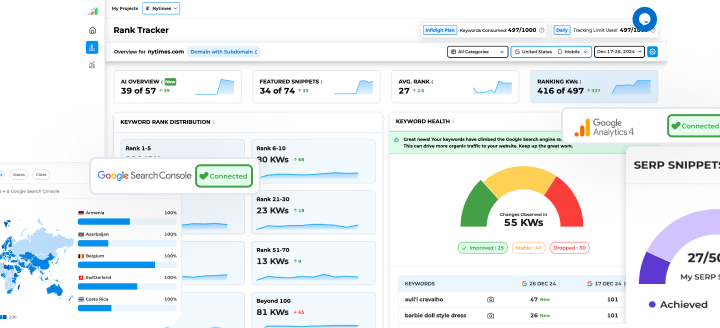
Google Search Console is a free tool for monitoring website performance and technical health.
A variety of metrics is available on GSC from search appearance to user experience. This helps to website to improve its performance and traffic from Google.
Things you can do with GSC:
- Monitor website performance on Google
- Find which pages are indexed by Google
- Submit sitemap and individual URLs for crawling
- Identify technical error
How to Set Up a Google Search Console Account
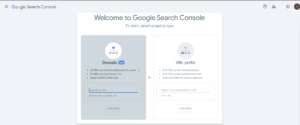
Step 1: Sign in to Search Console With Your Google account.
You need a Google account to set up Google Search Console. If you already have a Google Analytics account, Google Adwords, or Gmail, you can use the same login for this.
Step 2: Enter Your Website’s Domain (or URL-Prefix) to Add a Property.
After signing in, you have the option to add a property type that is the domain or a URL prefix.
Recommend you to set up Google Search Console using a domain.
Placing up Search Console via the “Domain” option sets up your account as a domain-level property.
This implies you’re making a single property that contains all subdomains and protocol prefixes associated with your domain. In other words, this chance join Google Search Console to every element of your site.
So here’s the following action for how to set up Google Search Console with a domain-level property. Enter your site’s root domain in the access domain and hit “Continue.”
Selecting “URL-prefix” sets up a URL-prefix property.
This means you’re making a single property for only one URL prefix for your site. As such, Search Console will only be linked to one performance of your site – not the whole item with all protocols/subdomains – and so it may not deliver real data. But occasionally you have no choice but to use a URL prefix. You can Add a site with the “URL prefix”. You can also add this for specific section for your site. For example https://www.yoursite.com/blog/. After Adding URL Click on Continue.
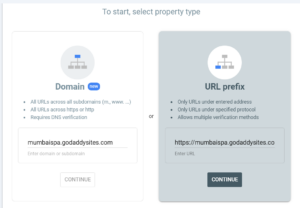
To set up a URL-prefix property, enter a URL with a prefix in the field, and click on “Continue.”
NOTE: In order to ensure Search Console provides real data with URL-prefix properties, create a GSC property for each of the next four URLs:
- https://yourdomain.com
- http://yourdomain.com
- https://www.yourdomain.com
- http://www.yourdomain.com
If you utilize different subdomains, like blog.yourdomain.com or shop.yourdomain.com, then you’ll like to make a property for each of those too. All informed, you will have to replicate the entire Google Search Console setup procedure for each of these URLs.
Step 3: Verify Your Website
To implement Google Search Console you need to verify that you own the website. The verification option depends on which option you chose in the previous step.
Verification for a Domain Property
The only one way is to verify a domain-level property is to go through your DNS provider.
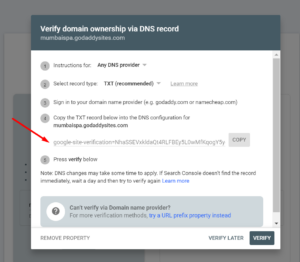
Copy the TXT record from the instruction box.
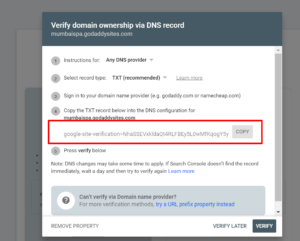
In a new tab, sign in to your account with the domain registrar. For eg. we will use GoDaddy as our domain registrar.
Once you log in, access your DNS sets by connecting on the nine dots in the navigation bar, beside your business name. And hitting “Domains.”

In your Domain Portfolio dashboard, you have to select 3 dots beside your domain name and click on “Edit DNS”
You will be in the DNS Management window. Add a new TXT record by clicking “Add” in the DNS Record Window.
A new pop-up will appear. Fill out as follows –
- Type: TXT
- Name: Mumbai Spa
- Value: (Paste the TXT record from GSC)
- TTL: 1 hour
- When you are done click on “Add record”
Now go back to Google Search Console and click on “Verify”
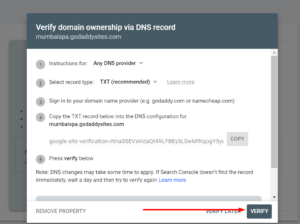
You will not get the message that says “Ownership verification failed”. Verification doesn’t work immediately it will take a few hours to 48 hours. Wait for an hour and verify again from the website properties list.
Upon successful verification, you will get a confirmation message.
Verification for a URL-prefix Property
Google permits numerous verification methods for a URL prefix:
- HTML file (recommended)
- HTML tag
- Google Analytics
- Google Tag Manager
- Domain name provider
Google recommend “HTML File” upload method. For that Click on “HTML File”, where you will have file download button.
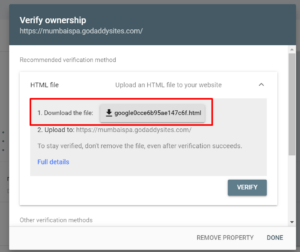
Download your HTML validation file and upload it to the root directory of the website you want to verify.
For example, if you want to verify “www.yourwebsite.com,” then the root directory is your homepage.
If you want to verify “www.yourwebsite.com/blog/,” then the root directory is “/blog/.”
In this case, you’d upload the file to “/blog/.” And all the child directories under it would be confirmed.
In this step, click “VERIFY” in the Search Console.
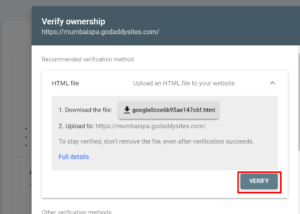
Similar to adding a domain property, you may need to wait for modifications to take effect.
If you aren’t able to instantly verify your site, check back later and pick the unverified property. GSC will try to automatically verify you.
![]()